All about Autotilers
Introduction
Often, in 2D games we represent the world as some sort of tilemap. Usually you can think of this as just a 2D array where each entry holds a tile. When it comes time to render, you can easily draw the map by translating every tile to a sprite and drawing that sprite to the screen. The result would probably look something like this:
 |
|---|
| Figure 1: A grid-based rendering of a tilemap |
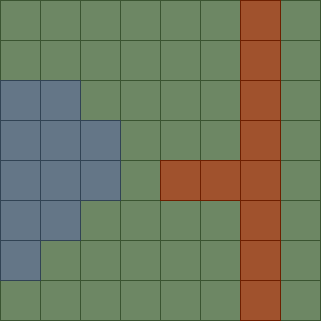
Although this is a good approach, it emphasizes the grid-based nature of the tilemap. Sometimes we want to get away from the “grid feel” and go for a more natural look. The key to creating more natural looking tilemaps is by creating higher-quality tile variations based on the situation that each tile finds itself in. Specifically for “blobmaps”, when deciding which tile sprite to draw, we will use information about the neighboring tiles to pick the best sprite that we can.
 |
|---|
| Figure 2: A blobmap based rendering approach, demonstrating more varied edges on blobs of the same tile type |
In figure 2, we are able to draw more defined edges on the water and grass. For each tile type to sprite translation that we perform, we first look at the tile’s neighbors and then we decide which sprite variety we will render.
Blobmaps
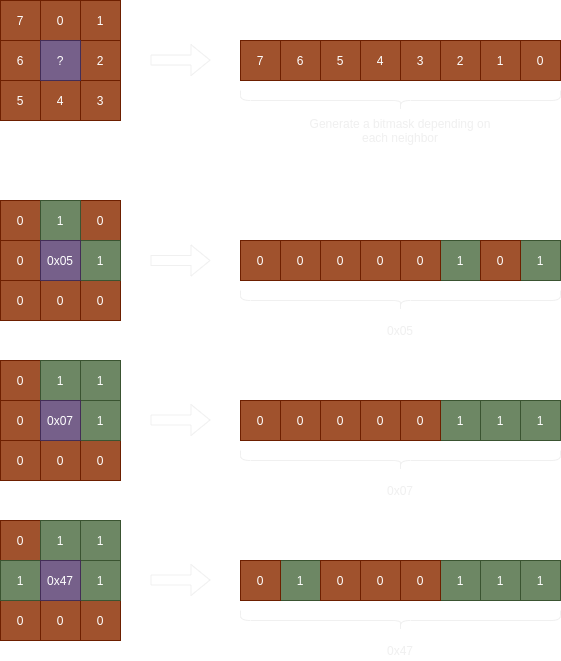
Blobmaps are a way to consider tile neighbors to generate the more natural pattern that you see in figure 2. To compute a blobmap, you basically look at each neighbor, compute a bitmask of all of the nighbors, then use that bitmask to select the correct tile. Let’s break down each step
In figure 3, you can see an illustration on how we convert neighbors to a bitmask. Essentially, each tile neighbor corresponds to a position in a bitmask. The neighbor directly North of the original tile assumes position 0 in the bitmask then we just rotate clockwise around the circle of neighbors to get the remaining positions in the bitmask. Since there are only 8 neighbors, the highest number we could compute is 255 which can be held in a uint8.
 |
|---|
| Figure 3: A demonstration on converting tile neighbors into a bitmask |
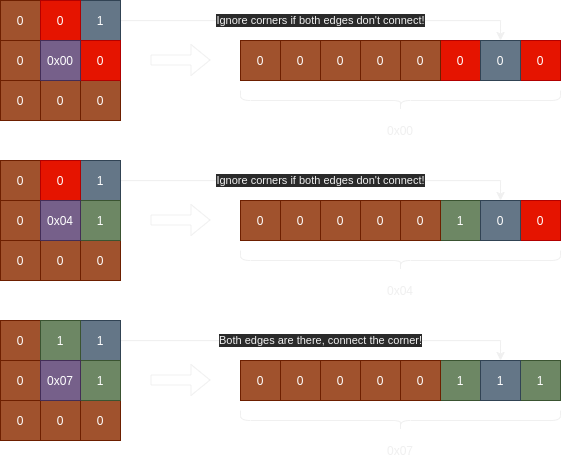
As you may have noticed, because out bitmask can generate 256 different numbers, that means we would need to handle 256 different cases - that’s a lot. And if you want, you can certainly handle each of those cases with a unique sprite. However, a lot of the corner cases are actually relatively safe to ignore. Take, for instance, figure 4 - Whenever we have a corner neighbor touching, we will ignore it unless both of the edges around that corner are also touching. By adding this minor rule, we can reduce the total number of possible tile outcomes to 48 - A major simplification.
 |
|---|
| Figure 4: It is safe to ignore situations where a corner touches, but one of the edges is missing |
Example Bitmasking Code
To make things a bit clearer, I figured some code would help (Written in Go):
// Compute the Blobmap Bitmask based on the state of each neighbor
func WangBlobmapNumber(t, b, l, r, tl, tr, bl, br bool) uint8 {
	// If surrounding edges aren't set, then corners must be false
	if !(t && l) { tl = false }
	if !(t && r) { tr = false }
	if !(b && l) { bl = false }
	if !(b && r) { br = false }

    // Compute the bitmask
	total := uint8(0)
	if t  { total += (1 << 0) } // Top
	if tr { total += (1 << 1) } // Top Right
	if r  { total += (1 << 2) } // Right
	if br { total += (1 << 3) } // Bottom Right
	if b  { total += (1 << 4) } // Bottom
	if bl { total += (1 << 5) } // Bottom Left
	if l  { total += (1 << 6) } // Left
	if tl { total += (1 << 7) } // Top Left

	return total
}
Putting it all together
 |
|---|
| Figure 5: A template of the 48 different tiling situations that we need to handle |
Wang Numbering
If we use the numbering produced by the bitmask above, each tile will be numbered as follows:
| 16 | 20 | 84 | 80 | 219 | 92 | 116 | 87 | 28 | 125 | 124 | 112 |
| 17 | 21 | 85 | 81 | 29 | 127 | 253 | 113 | 31 | 119 | — | 245 |
| 1 | 5 | 69 | 65 | 23 | 223 | 247 | 209 | 95 | 255 | 221 | 241 |
| 0 | 4 | 68 | 64 | 117 | 71 | 197 | 93 | 7 | 199 | 215 | 193 |
Packed Numbering
If we want to pack their numbers in scanline order, we can just number them this way. This can help when managing your spritesheet. For my applications, I typically export each tile sprite with its packed number appended to the image name (ie dirt_0.png, dirt_1.png). Most art programs support exporting multiple frames with a 0 ... n numbering scheme.
| 0 | 1 | 2 | 3 | 4 | 5 | 6 | 7 | 8 | 9 | 10 | 11 |
| 12 | 13 | 14 | 15 | 16 | 17 | 18 | 19 | 20 | 21 | 22 | 23 |
| 24 | 25 | 26 | 27 | 28 | 29 | 30 | 31 | 32 | 33 | 34 | 35 |
| 36 | 37 | 38 | 39 | 40 | 41 | 42 | 43 | 44 | 45 | 46 | 47 |
Reducing it further
If our tileset is rotationally symmetric, then we can actually reduce the tile set even more by re-using the same tile sprite but rotating it before we draw.
| Images |  0° Rotation |
 90° Rotation |
 180° Rotation |
 270° Rotation |
| Decimal | 20 |
80 |
65 |
5 |
| Hexadecimal | 0x14 |
0x50 |
0x41 |
0x05 |
| Binary | 0001_0100 |
0101_0000 |
0100_0001 |
0000_0101 |
Because we organized our bitmask in a clockwise rotation, we can easily get the 90° rotated version of any tile sprite by rotating the binary representation by 2. The decimal equivalent equation for this 90° rotation is:
rotatedNumber := (originalNumber * 4) % 255
By exploiting rotations, we end with the following set:
References
You can check out these references too: